The introduction of G4 tming gates delivers our new SwiftAir technology.
Swift G4 gates have Blutooth, WIFI, and SwiftAir wireless communications.
SwiftAir brings fantastic reliability and long range . We introduced it to meet the ongoing issue with Wifi congestion which is getting worse every day.
G4 gates still carry Wifi for backward compatability reasons with old UNO and DUO gates, which are now discontinued. Should you mix UNO or DUO with G4 , SwiftAir is disabled.
NOTE: SwiftAir , at this stage has only been released for linear drills. i.e. drills where the gates are sequentially triggered, and no gate is triggered more than once. For other drills the system will drop back to Wifi connection.
There is one caveat here in that you can trigger one gate more than once if you only have one gate in your drill. A simple
5-10-5 drill is a good example. In this drill the connection is simply Blue tooth
IMPORTANT : SwiftAir must be enabled by us in your SYNCRO app. We require your SYNCRO/LABS login to achieve this.
Enabling SwiftAir
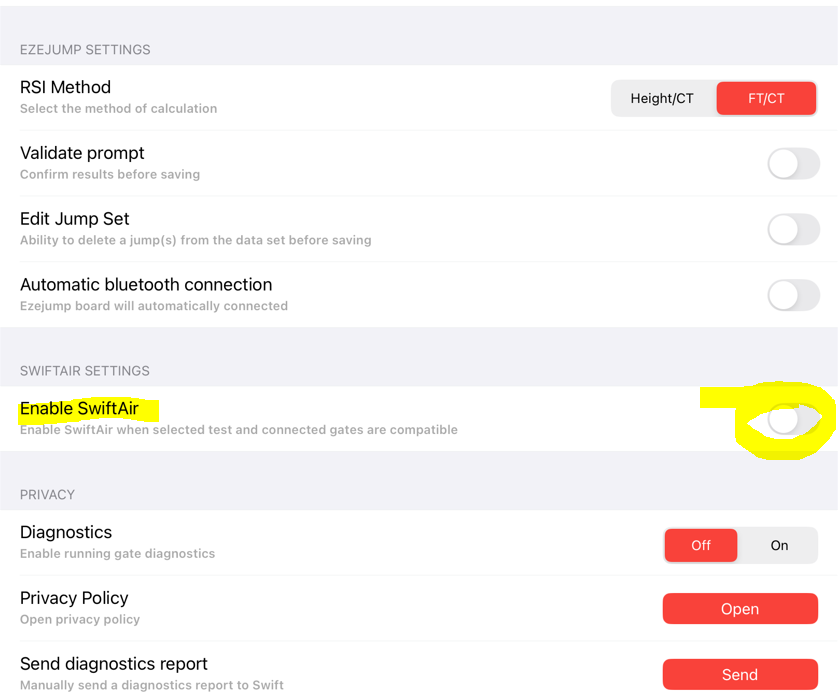
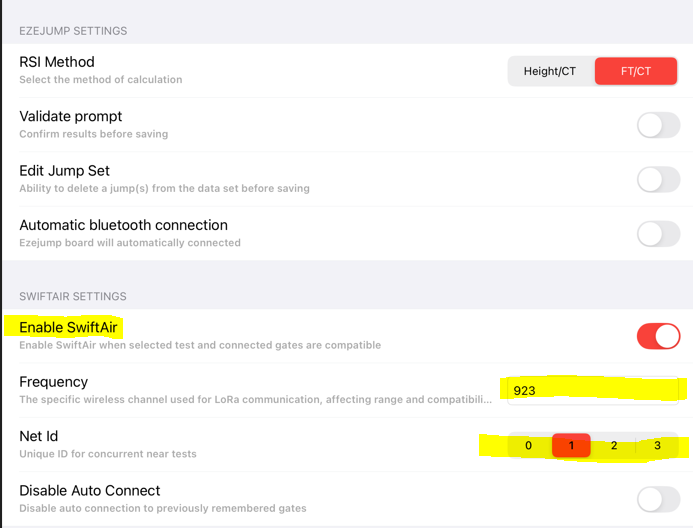
- Step 1 - Ensure you have enabled Swift air in the Syncro app (Settings). Scroll to the bootom the page, look for the SwiftAir option and "enable". The images below show the App with Swiftair disabled, and then Enabled. Not that you will NOT see the SwiftAir option without a valid subscription.
- When enabled you will see the following variables
- Frequency - This defines the frequency your syste is running on. you should enter values in the following ranges dependant on your country (if your region is not listed please contact support@swiftperformance.com
- (Europe: 863–870 MHz)
- (North America: 902–928 MHz)
- (Asia-Pacific: 915–928 MHz)
- (Australia: 915–928 MHz)
- (India: 865–867 MHz)
- Net ID - If you are using more than one G4 system, or for example you are splitting your 4 gates ystem into two, 2 gate systems , ensure that the second coach is using a differnt Net ID to you, to avoid communication clashes
- Disable Auto Connect - We normally leave this off , but you can diable if required
- Frequency - This defines the frequency your syste is running on. you should enter values in the following ranges dependant on your country (if your region is not listed please contact support@swiftperformance.com
- When enabled you will see the following variables
Gate Connection
- After selecting a drill to run in SYNCRO you will be advanced to the gate connection page.
(SwiftAir connection differs somewhat from the connection schma when using Wifi. This is fully documented here) - Once in the connection page you will see
- The number of gates required for your test
- The details of your SwiftAir settings
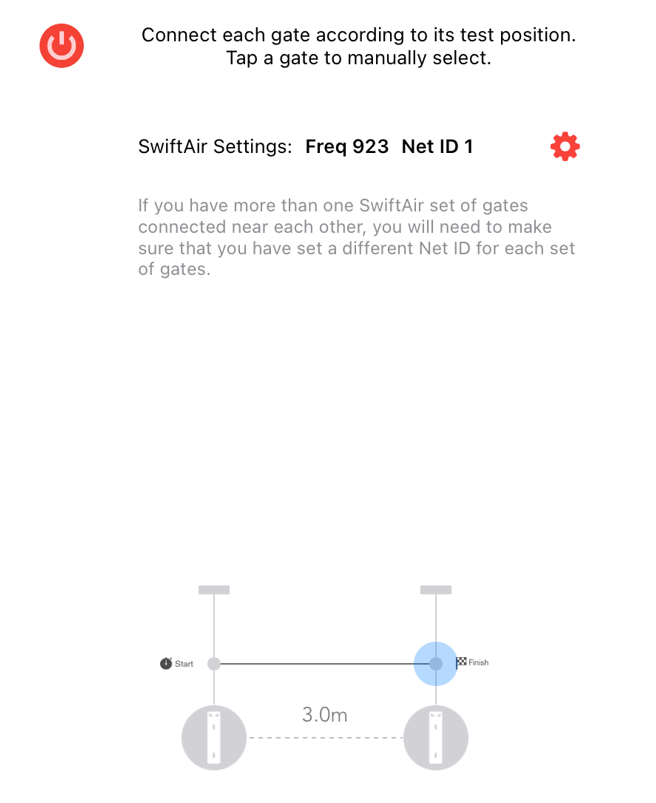
- Its now time to turn your gates on. Give them a 5 -10 seconds to boot, then simply tap on a 'greyed-out' gate to see a list of available gates.
Tap on this to identify gates
Tap on this to connect your gate
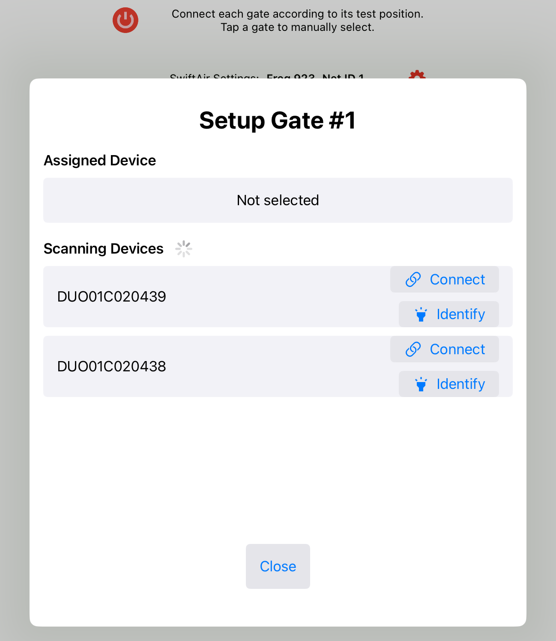
- Repeat for all gates
Gate Alignment
You are now ready to put your gates in position, and align with reflectors. All gates will be connected and will be showing a colour.
Tap 'Align' -marked in yellow below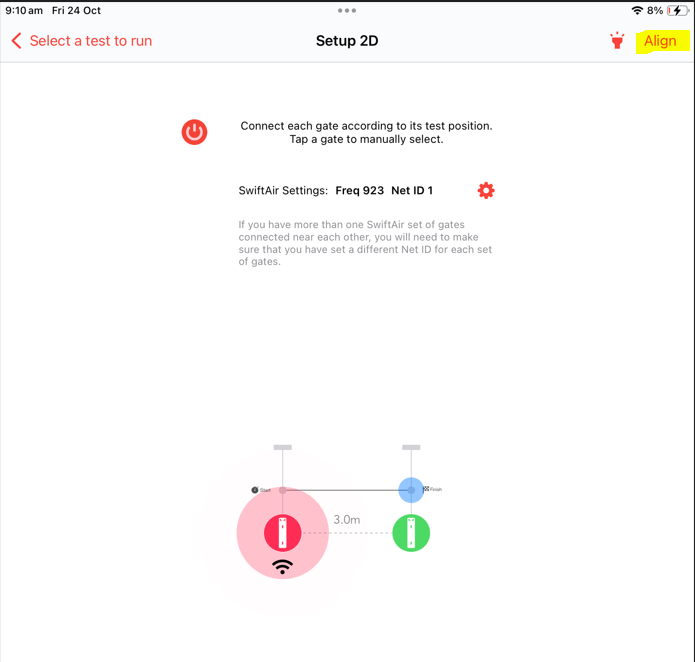
At this stage the system will sequentially put each gate in alignment mode. Note that you must align the gates sequentially.
When aligning gates
- An un-aligned gate will have a slowly pulsing Led Strobe
- Unlock the tripod head and adjust the gate to point toward the reflector. DO NOT try and adjust by moving the reflector.
- With Dual beam gates try and align the laser pointer with the target on the reflector. With a single beam gate you dont have this option. You may have to get down low behind the gate and look for the red colour in the reflector.
- When aligning the gate you need to traverse the gate across the reflector from left to right. You will hear it 'beep' when it finds the reflector and 'beep' again when it losed the reflector. Your task is to find that happy spot between these two 'beeps"
- Once found, lock the tripod head and in few seconds the Led Strobe will extinguish, and the system will advance to the next gate for alignment.
- Repeat for all gates.
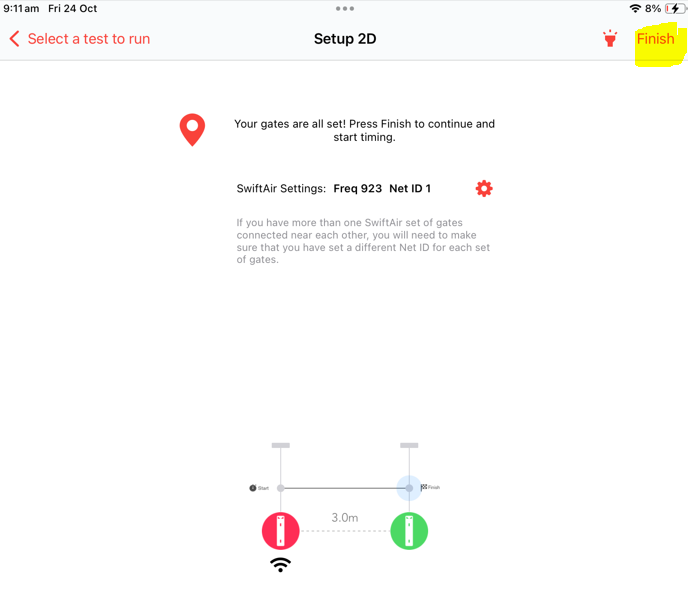
- When all gates are aligned you will see "finsh" in the top right hand corner. Tap this to advance to the run-test page.
Running your test
Its now time to run your test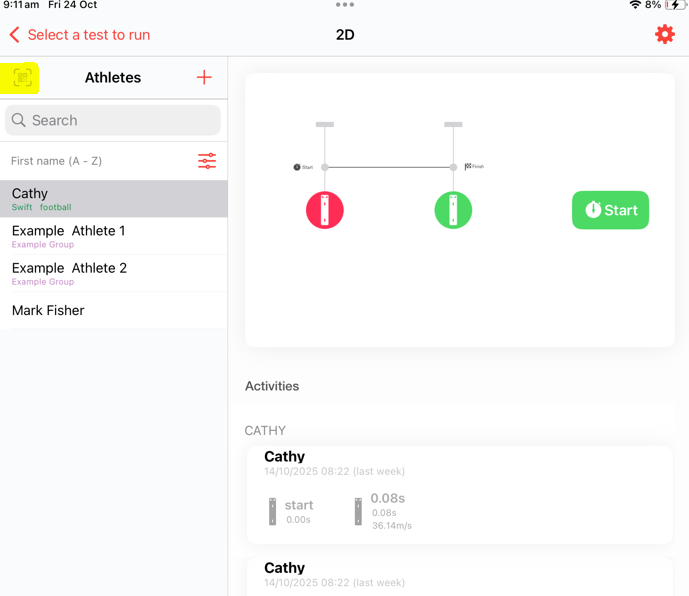
- Select your athlete from the list on the left.
- You can set filters to sort, or select groups as required.
- You can also use the QR code scanner function in the top right hand corner if you have prepared QR code stickers for your athlete. Read this article for details
- STARTING
- Out of beam starts
- Press Start when you are ready.
- LED Strobe will begin flashing GREEN
- When the athlete breaks the beam timing starts
- In beam Starts - use Steady Start fro best results
- Press "Arm" when ready
- LED Strobe will begin flashing RED
- Athlete then steps in and blocks the beam -
- LED Strobe will begin flashing YELLOW, indicating the ebam is blocked
- After 2 seconds of continuos blocked beam the LED Strobe will begin flashing GREEN
- When the athlete leaves timing starts
- Out of beam starts
Was this article helpful?
That’s Great!
Thank you for your feedback
Sorry! We couldn't be helpful
Thank you for your feedback
Feedback sent
We appreciate your effort and will try to fix the article